

This guide provides clear steps to organize your garden tools using storage organizers. It is designed for homeowners or gardeners seeking a tidy, accessible, and durable system. Expect to spend about 1-2 hours assembling and installing your organizer. The result will be a neat, well-arranged space where tools are easy to find and protected from damage.
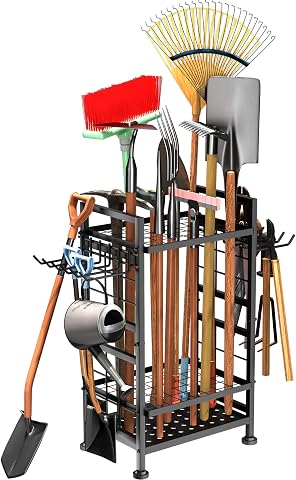
3 Tier Garden Tool Organizer, Heavy Duty Metal Yard and Garage Storage for Up to 78 Tools
- ✔ Tool Capacity: 78 tools
- ✔ Material: Coated steel
- ✔ Dimensions: 17"L x 12.8"W x 30.3"H
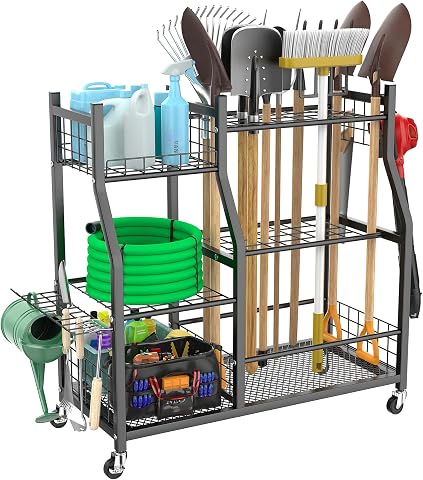
WALMANN Garden Tool Organizer with Wheels for Garage, Large Storage Capacity, Rakes/Shovels/Yard Tools Storage Stand for Shed, Ga…
- ✔ Shelf Type: Garden tools stand
- ✔ Number of Shelves: 3
- ✔ Material Type: Metal

EverHanger Garden Tool Organizer Stand with Lockable Wheels
- ✔ Dimensions: 36.25" L x 15.75" W x 37.25" H
- ✔ Material: Alloy Steel
- ✔ Number of Shelves: 5
Difficulty: Intermediate | Time: 1-2 hours
What You’ll Need
Tools & Materials:
- drill or screwdriver
- measuring tape
- level
- hammer
- utility knife
Knowledge:
- basic carpentry skills
- ability to use power tools safely
Ensure the chosen location is suitable for installation — check for power or water lines if mounting indoors or in a shed. Measure the area beforehand to select an appropriately sized organizer.
Amazon Product B0D5LF3H61
As an affiliate, we earn on qualifying purchases.
3 Tier Garden Tool Organizer, Heavy Duty Metal Yard and Garage Storage for Up to 78 Tools
This **3-tier steel organizer** stands out for its **exceptional durability** and **large capacity**, capable of holding up to 78 tools, including handles, D-handle, and hanging tools. Its sturdy coated steel construction makes it suitable for both indoor and outdoor use, providing a versatile solution for those with extensive tool collections. Compared to wheeled options, it remains stationary but offers superior stability. The main tradeoff is its weight, which can make relocation challenging once assembled, and the assembly process might be somewhat time-consuming. Nonetheless, for anyone prioritizing robust, high-capacity storage without mobility, this model is a top choice.
Pros:
- Sturdy, durable coated steel construction
- High capacity with multiple storage options
- Suitable for indoor and outdoor use
- Easy to assemble with detailed instructions
Cons:
- Heavy to move once assembled
- Limited to garden and yard tools only
- Assembly could be time-consuming
Best for: Gardeners with extensive tool collections who need a durable, stationary organizer.
Not ideal for: Users seeking frequent mobility or those with limited space who prefer compact options.
Bottom line: Ideal for those needing a durable, high-capacity storage solution that stays put.
“Ideal for those needing a durable, high-capacity storage solution that stays put.”
Amazon Product B0D9W88DGF
As an affiliate, we earn on qualifying purchases.
WALMANN Garden Tool Organizer with Wheels for Garage, Large Storage Capacity, Rakes/Shovels/Yard Tools Storage Stand for Shed, Ga…
The **WALMANN rolling cart** offers **great mobility** with its three-tier design and sturdy wheels, making it ideal for those who need to move tools between different areas. It features multiple shelves, hooks, and a durable steel frame with a rust-resistant coating, ensuring longevity in outdoor environments. Compared with stationary organizers, its main advantage is effortless movement, but this depends on the wheels holding up over time—wheels may wear or require replacement with heavy use. Assembly is required and might take some patience, but once set up, it provides a flexible storage solution for a variety of garden tools, especially for users who frequently reorganize or relocate their gardening setup.
Pros:
- Large storage capacity with multiple shelves and hooks
- Wheeled design for easy mobility
- Rust-resistant steel construction
- Suitable for garage or outdoor use
Cons:
- Assembly required
- Wheels may wear over time
- Limited to freestanding use
Best for: Gardeners who want a mobile, large-capacity storage option for garage or yard use.
Not ideal for: Those preferring wall-mounted or non-wheeled solutions, or limited space where mobility isn’t needed.
Bottom line: Great for users who need flexible, mobile storage but are okay with assembly and potential wheel maintenance.
“Great for users who need flexible, mobile storage but are okay with assembly and potential wheel maintenance.”
Amazon Product B0DWMFCNBT
As an affiliate, we earn on qualifying purchases.
EverHanger Garden Tool Organizer Stand with Lockable Wheels
The **EverHanger stand** is built for those who need **maximum capacity and organized categorization**. Its five shelves and multiple sections allow quick access to different tool types, making it ideal for large collections. Crafted from **rust-proof alloy steel**, it withstands outdoor conditions while offering **lockable wheels** for stability on uneven ground. This model’s size and weight—over 9 kg—offer excellent stability but make relocation more effort, especially on uneven terrain. Assembly can be time-consuming, and its size means it’s better suited for spacious garages or sheds rather than tight storage closets. If your priority is extensive, organized storage with mobility and stability, this is a top-tier choice.
Pros:
- Large storage capacity with multiple sections
- Rust-proof alloy steel construction
- Lockable wheels for stability on uneven ground
- Organized categorized storage
Cons:
- Assembly may be time-consuming
- Heavy weight complicates relocation
- Size may be too large for small spaces
Best for: Home gardeners with large tool collections needing organized, stable, mobile storage.
Not ideal for: Small spaces or users who prioritize lightweight, easy-to-move options.
Bottom line: Perfect for those needing extensive, organized, and stable storage in larger spaces.
“Perfect for those needing extensive, organized, and stable storage in larger spaces.”
As an Amazon Associate we earn from qualifying purchases.
Before You Start
Clear the installation area of debris and ensure the surface is clean and dry. Confirm all tools and materials are on hand before beginning. If mounting on drywall, verify wall strength or use appropriate anchors to support the weight of tools and organizer.
Step-by-Step Instructions
Step 1: Select the Location for Your Organizer
Identify a convenient, accessible wall or area in your shed, garage, or garden where the organizer will be mounted. Ensure there is enough space for all tools you intend to store.
Tip: Choose a spot close to where you typically work in the garden for easy access.
Check: You can comfortably reach and see the entire storage area without obstruction.
Step 2: Measure and Mark Mounting Points
Use a measuring tape to determine the height and width of the organizer. Mark the mounting points on the wall with a pencil, using a level to ensure straight lines.
Tip: Double-check measurements to ensure the organizer will fit and be level before drilling.
Check: All mounting points are marked evenly and level, ready for installation.
Step 3: Install Wall Anchors and Mounting Hardware
Drill holes at the marked points. Insert wall anchors if mounting on drywall or hollow surfaces. Securely screw in hooks, brackets, or the mounting brackets of the organizer into the anchors.
Tip: Use a level to verify the organizer will hang straight before fully tightening all screws.
Check: The hardware is firmly attached, with no wobbling or looseness when gently tested.
Step 4: Mount the Organizer
Hang the organizer onto the mounted hardware, ensuring it is securely seated and level. Adjust if necessary before tightening all screws.
Tip: Check stability by gently pulling on the organizer; it should not shift or wobble.
Check: The organizer is firmly mounted, level, and stable.
Step 5: Arrange Your Garden Tools
Hang or place your tools on the organizer, using hooks, brackets, or shelves as designed. Group similar tools together for easy access.
Tip: Place frequently used tools at eye level or in the most accessible spots.
Check: Tools are organized logically, easily accessible, and securely hung.
Common Mistakes to Avoid
- Mounting the organizer on an unstable or weak wall surface. — Use appropriate wall anchors or locate a stud for secure mounting.
- Overloading the organizer beyond its weight capacity. — Check the weight limit of your organizer and distribute tools evenly.
- Not leveling the organizer during installation. — Use a level during mounting and adjust before tightening all screws.
Troubleshooting
Problem: Organizer wobbles or feels loose after mounting.
Solution: Tighten all screws and ensure anchors are properly installed into a solid wall or stud.
Problem: Tools fall off or are difficult to hang.
Solution: Use appropriate hooks and brackets suited for the weight and size of your tools; adjust placement for better support.
What Success Looks Like
The final setup should have a stable, level organizer securely attached to the wall. Tools should hang neatly without falling and be easy to access, with no wobbling or looseness.
Next Steps
Regularly inspect the organizer for stability and cleanliness. Reorganize tools as needed, replacing worn hooks or adding compartments for better organization. Consider labeling sections for different tool types.
Frequently Asked Questions
Can I install a garden tool organizer on drywall?
Yes, but use wall anchors designed for drywall to support the weight of your tools and organizer.
What if my tools are too heavy for hooks?
Use stronger brackets or shelves, and mount into wall studs when possible for maximum support.
How often should I clean or reorganize my tools?
Inspect and clean your tools after each use. Reorganize quarterly or as needed to maintain an efficient system.